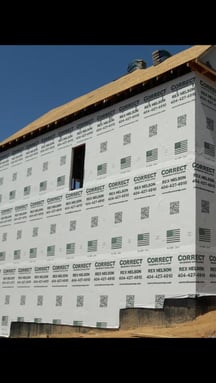
 When properly installed, housewrap can be the workhorse of a home’s exterior envelope, as a weather-resistive barrier that performs as the buildings shell, repelling water while also allowing water vapor to pass to the outside of the structure. But, like everything else in construction, it only works well if properly installed. Rex Nelson of Correct Housewrap Installation estimates that 90 percent of housewrap installations are bad, which he says is not only avoidable, but potentially very damaging to the home’s exterior. Nelson says that contractors should understand what the product is intended to do and be trained on properly installing it, which will help improve housewrap jobs and building durability in the long run.
What Housewrap Does
Housewrap can be a dual-function product that that serves primarily as a water-resistive barrier but can also serve as an air barrier if it’s sealed at every seam. It usually consists of fibrous spun polyolefin plastic, but may also include other materials woven or bonded to it to help resist tearing. It is applied to the exterior of the home’s frame, protecting the structural components from water and wind that can eventually lead to mold and wood rot.
Because of the simplicity of the product and the speed at which it can be rolled out and installed unto the building exterior, framers and other trades who affix it may rush through the process, making a mess of installation and leaving the outer façade partially or completely uncovered and untidy – something that isn’t likely to be fixed by the trades that follow.
“We’ve all seen bad housewrap installations – they’re easy to spot because they’re messy and they’re messy because they’re poorly installed,” Nelson says. “The problem more often than not is that framers put it on while building the wall piece-by-piece, which increases the likelihood of shoddy installation.” Since housewrap plays such a major role in protecting the exterior of a home from deterioration and can improve its energy efficiency, Nelson offers some recommendations on getting the job done right.
All about the Installation
It’s critical to select the right housewrap for a home’s climate from the dozens of varieties available, but even before that, you’ll need to find out if a house wrap is required for code compliance in your jurisdiction. Once you’ve determined if it’s necessary to meet code, you must be sure to install the product in strict adherence to manufacturer specifications so that it functions as intended.
While manufacturer instructions for installing housewrap vary, generally there are three main tasks involved: wrapping, taping and flashing.
- Wrapping – Wrapping should start at the foundation, extending at least an inch past the wall-to-foundation intersection and continuing upwards like shingle installation with the higher course overlapping the lower. Horizontal seems should overlap at least 2 inches and vertical seams a minimum of 6 inches.[1]
- Taping or Fasteners – All of the seams for the product should be taped or secured with cap fasteners according to manufacturer’s instructions. Stapling housewrap can cause tears, so installers must be careful when using a stapler.
- Flashing - One of the most precise jobs when working with housewrap is properly installing the product around windows and doors. Flashing of exterior windows and doors is critical in casting rain water away from those areas so that assemblies remain dry and durable. There are many good YouTube videos and technical documents that will help guide installers in proper flashing techniques for windows and doors, including this Technotes piece from the Home Innovation Research Labs and the Internal Code Council.
While the steps are simple, the devil is in the execution. As Nelson notes, more often than not, house wrap is poorly installed by one contractor and never corrected by the trades that follow. “Speed is good, but accuracy and precision are better,” he noted. He offered two recommendations for getting the job done right:
- Install the housewrap before the windows and doors go in, but after the roof is on, using the housewrap over any and all step flashing and ensuring that there’s a positive drain plain at the bottom of the siding.
- Contractors should always come back and repair the wrap if needed after the builder or framers move or adjust any door or window openings prior to the installation of the exterior siding.
Moisture can be a common cause of building deterioration and can result in expensive corrective work for the builder and homeowners. Ensuring that housewrap installations are done correctly will help minimize the likelihood of moisture-related building damage.
[1] http://www.benjaminobdyke.com/uploads/resources/Understanding_Housewrap.pdf